SKYBEARZONE

GOOGLE TRANSLATION

Avast Home Edition

Avast Home Edition is a complete ICSA & Checkmark certified antivirus, Checkmark certified anti-spyware & anti-rootkit package. Avast includes the following components: On demand scanner with skinnable simple interface, just select what do you want to scan in which way and press the Play button; On access scanner, special providers to protect the most of available e-mail clients; Instant messaging--ICQ, Miranda; Network traffic--intrusion detection, lightweight firewall; P2P protection for Kazaa, BitTorrent; Web shield--monitors and filter all HTTP traffic; NNTP scanner--scans all Usenet Newsgroup traffic and all operations with files on PC; Boot time scanner--scans disks in the same way and in the same time as Windows CHKDSK does.

Version 4.8.1229.80723 improves the unpacking engine.


DOWNLOAD


Digg Technorati del.icio.us Stumbleupon Reddit Blinklist Furl Spurl Yahoo Simpy

AVG Anti-Virus Free Edition 8.0.138


AVG Free Edition is the well-known antivirus protection tool. AVG Free is available free of charge to home users for the life of the product. Rapid virus database updates are available for the lifetime of the product, thereby providing the high level of detection capability that millions of users around the world trust to protect their computers. AVG Free is easy to use and will not slow your system down (low system resource requirements. Highlights include automatic update functionality, the AVG Resident Shield, which provides real-time protection as files are opened and programs are run, free Virus Database Updates for the lifetime of the product, and AVG Virus Vault for safe handling of infected files.

Version 8.0.138 is a maintenance release.

DOWNLOAD

http://rapidshare.com/files/140149983/avg_free_stf_en_8_138a1332.rar


Digg Technorati del.icio.us Stumbleupon Reddit Blinklist Furl Spurl Yahoo Simpy

List of Compatible Antivirus for Windows Vista

One of the major factors that is keeping people from upgrading to Windows Vista is the software compatibility factor. Not all software is prepared for Vista which can make the upgrade frustrating. There are several sites putting together lists of software as they become compatible. You can find the complete list here, broken down into categories. It’s a Wiki, so if you know of additional software that’s Vista Compatible, you can go ahead and add it to the list. Below you’ll find a list of compatible AntiVirus software. Afterall, a good anti-virus is absolutely necessary, and one of the first things you should probably install.

AntiVirus:


Digg Technorati del.icio.us Stumbleupon Reddit Blinklist Furl Spurl Yahoo Simpy

Vista Activation [crack]


Windows Vista Activation and OEM Information is an all-in-one (AIO) activator to crack Windows Vista. The activator for all versions of Vista works by using Vista Loader version 2.1.2, which simulate a BIOS that contains SLIC information which allows Vista OEM activation. The best thing about StRO Vista Activator is that it’s fully customizable and has the most comprehensive selection or OEM manufacturers or vendors. Vista Activator has an user friendly graphical interface (GUI) to help users activate WindowsVista. Users can choose to a list of BIOS manufacturers to emulate, namely ASUS, Acer, Dell, Fujitsu-Siemens, Gateway, Hewlett-Packard (HP), Lenovo, NEC, Sony and Toshiba. Which brand you select is not important, as the Vista Activator will automatically install the corresponding OEM product key to activate Vista as OEM version. To use the Vista activator, you will need to run Vst.X-Free.AO_2.1.2.1.2.exe with administrator privileges. No matter whether you use the Vista activator to activate Windows Vista or not, you can always make your Vista system to look like a OEM system from a manufacturer. Simply install OEM logo and information of the manufacturer you like using the right pane of the activator.


Digg Technorati del.icio.us Stumbleupon Reddit Blinklist Furl Spurl Yahoo Simpy

Winrar 3.80 beta 4


Version 3.80 beta 4

1. In some situations previous beta versions could fail to create RAR recovery volumes.

2. In previous beta versions it was impossible to change a name of next volume in "Next volume" dialog. Volume name specified by user was ignored.

Version 3.80 beta 3

1. Console RAR displays the percent of repacked data when updating files in solid archive. Previously the repacking progress indicator was available only in GUI WinRAR.

2. Switch -ieml.[arcname] did not delete an archive after emailing it even if dot character was specified in the switch.

Version 3.80 beta 2

1. Bugs fixed:

a) beta 1 could display random garbage characters in context menu in Windows x64;

b) beta 1 could display only a part of files in tar.gz archives;

c) beta 1 could fail to set timestamps for files extracted from ZIP archives;

d) beta 1 could issue a rename error message and abort when creating RAR volumes with Unicode characters in archive name.

Version 3.80 beta 1

1. Added support for ZIP archives containing Unicode file names in UTF-8 format. When creating ZIP archive, WinRAR stores names in Unicode only if they cannot be stored correctly using the current single byte character set.

2. Added decompression support for WinZip AES encrypted ZIP archives.

3. Improved Unicode support for RAR and ZIP archive names.

4. "Ask before overwrite" and "Skip existing files" update modes are now available in archiving dialog. They allow to specify WinRAR behavior when updating already existing files in archive. Unlike already available "Fresh existing files only" and "Add and update files", these new modes ignore file date and compare only file names.

Command line equivalents of these modes are:

a) switch -o enables "Ask before overwrite" archiving mode;

b) switch -o- enables "Skip existing files" archiving mode;

c) switch -o+ enables "Overwrite all" mode (default for archiving).

5. New "Add to context menu" option in "Profile parameters" dialog. If this option is on, the profile name will be displayed in Explorer context menus allowing to activate a profile from context menu.

6. New -cp switch allows to select a compression profile in command line mode. It is supported only by GUI WinRAR.exe, not by rar.exe.

7. New "Options" page of archiving dialog contains the group of settings modifying the behavior of "Delete files after archiving" option from "General" page:

a) Delete files. Delete files normally like in previous WinRAR versions.

b) Move files to Recycle Bin. Deleted files are placed to Recycle Bin.

Command line equivalent of this option is -dr switch.

c) Wipe files. Before deleting file data are overwritten by zero bytes to prevent recovery of deleted files.

Command line equivalent of this option is -dw switch.

All these options have an effect only if "Delete files after archiving" is on. You can enable any of these options in the default compression profile to change the default behavior of "Delete files after archiving".

8. WinRAR "Extraction path and options" dialog is now resizable. You can use the mouse to drag its border to the desired size and provide more space for folder tree pane. WinRAR will store new dimensions of this dialog.

9. New "Update" SFX script command and "Update mode" group of options in "Update" page of "Advanced SFX options" dialog. These command and options allow to check time and implement file time based updating;

10. SFX script "Shortcut" command and "Add shortcut..." command in "Advanced SFX options" dialog now allow to specify an icon file containing an icon associated with shortcut.

11. New "Wipe temporary files" option in "Settings/Security" dialog provides more secure, though slower, way to delete temporary WinRAR files.

12. WinRAR and RAR display the total progress bar when unpacking a multivolume RAR archive if all volumes are present in the same folder.

13. WinRAR and RAR automatically expand names of environment variables in list files. For example, a list file can contain lines like:

%windir%\*.exe

%USERPROFILE%\Desktop

This feature is available only in Windows RAR version.

14. Added support of TAR archives with non-zero "extra field" data.

15. Added support of TAR archives, which does not contain the end of archive entry consisting of 512 zero bytes.

16. Improved Unicode support when dragging files from WinRAR window.

17. Shift+Tab key combination can be used in main WinRAR window to switch the input focus between interface elements (files, comment, tree, address) in reverse order. In previous versions Shift+Tab used the same order as Tab.

18. Corrected a possible WinRAR crash when opening truncated UDF ISO files.


DOWNLOAD

http://rapidshare.com/files/139905974/wrar38b4.rar

wrar38b4.rar


Digg Technorati del.icio.us Stumbleupon Reddit Blinklist Furl Spurl Yahoo Simpy

WinRAR 3.71 Corporate Edition (No SeriaL & Crack Needed)

WinRAR is a 32-bit Windows version of RAR Archiver, an archiver and archive manager. RAR files can usually compress content by 8 percent to 15 percent more than ZIP files can. WinRAR's main features include strong general and multimedia compression, the ability to process non-RAR archive formats, ZIP compression and decompression, support for long filenames, programmable self-extracting archives (SFX), repair of damaged archives, authenticity verification, embedded file comments, and encryption. Unicode is supported in archive filenames, allowing non-English filenames to be handled painlessly. You can manipulate the parameters of many archives at once and view a volume sequence as a single archive. WinRAR can convert other archive formats to RAR and search for specified text and files in archives.

Changes in Version 3.71:

1. Archive names in rar.log error log file always include the full path.
2. WinRAR tray icon is compatible with high DPI display modes.
3. If you modified a file in archive with encrypted names using an external editor, WinRAR will not ask for archive password again when prompting to update a file. It will use a password which you entered when opening an archive,
4. Bugs fixed:
a) switch -tl and "Set archive time to latest file time" option could fail in previous version. Sometimes they set archive time to current system time instead of latest file time;
cool.gif if -ag switch mask contained archive number, month and minute characters, placed 'I' character instead of minute value into generated archive name WinRARfor archive numbers exceeding 1;
b) high ASCII names in ISO files using ISO 9660 format without Joliet format extension were displayed incorrectly;
c) WinRAR could crash when decompressing some of corrupt RAR archives;
d) if "Turn PC off when done" option was set in "Convert archives" command, WinRAR turned PC off after converting the first archive in selected group instead of after converting the entire group;
e) if user specified a non-existent destination path in SFX archive in Vista, SFX could enter into infinite "create new SFX window" loop;
f) WinRAR could fail to unpack an individual file from subfolder of ACE archive using the drag and drop.


Digg Technorati del.icio.us Stumbleupon Reddit Blinklist Furl Spurl Yahoo Simpy

Genuine XP, Vista & Office 2007

1 Click Activate & Genuine XP, Vista & Office 2007


Activate & genuine your windows with one click....

1) For Windows XP :- Run CrackXP.bat
2) For Windows Vista :- Run CrackVista.bat


The useful CD keys
Windows 98 Second Edition: HQ6K2-QPC42-3HWDM-BF4KJ-W4XWJ
Windows 2000 Professional: W47TG-HHDT8-KR9BP-CCJD3-TWR3Y
Windows XP Home Edition SP1 OEM: P73HW-44F8P-2X9G4-YYR8Y-GC6XY
Windows XP Professional SP1 OEM: XJM6Q-BQ8HW-T6DFB-Y934T-YD4YT
Windows XP Corporate Edition: XKM6R-TX82G-TK4VP-TJBWX-6MTXD

Windows XP Professional SP2: K2KB2-BDBGV-KP686-D8T7X-HDMQ8
Windows XP Home OEM: JQ4T4-8VM63-6WFBK-KTT29-V8966
Windows XP Home Retail: RH6M6-7PPK4-YR86H-YFFFX-PW8M8
Windows XP Home Upgrade: RH6M6-7PPK4-YR86H-YFFFX-PW8M8
Windows XP Media Center 2005: C4BH3-P4J7W-9MT6X-PGKC8-J4JTM
Windows XP Professional Corp: XP8BF-F8HPF-PY6BX-K24PJ-TWT6M
Windows XP Professional OEM: XJM6Q-BQ8HW-T6DFB-Y934T-YD4YT
Windows XP Professional Retail: CD87T-HFP4C-V7X7H-8VY68-W7D7M
Windows XP Professional Upgrade: CD87T-HFP4C-V7X7H-8VY68-W7D7M
Windows Longhorn: CKY24-Q8QRH-X3KMR-C6BCY-T847Y
Windows Vista Final 6000 Gates: YFKBB-PQJJV-G996G-VWGXY-2V3X8
Microsoft Office 2000: GC6J3-GTQ62-FP876-94FBR-D3DX8
Microsoft Office XP: FM9FY-TMF7Q-KCKCT-V9T29-TBBBG
Microsoft Office 2003: GWH28-DGCMP-P6RC4-6J4MT-3HFDY
Microsoft Office 2007: KGFVY-7733B-8WCK9-KTG64-BC7D8


Digg Technorati del.icio.us Stumbleupon Reddit Blinklist Furl Spurl Yahoo Simpy

Ashampoo Burning Studio 8


Ashampoo Burning Studio 8 is a complete, compact, and easy burning suite. It's a single program that can fulfill all of your CD/DVD/Blu-ray burning needs. You just choose from a list of tasks and the program guides you through every step. Even though it has all the functions you would expect from a complete burning suite, the entire program takes up less than 85MB on your hard disk.


Digg Technorati del.icio.us Stumbleupon Reddit Blinklist Furl Spurl Yahoo Simpy

Tips and Tricks for Nokia Mobiles


FAQ'S FOR NOKIA MOBILES

Cant delete a file normally?

When you cant delete a file which is in your inbox the normal way, here is what you can do;

1. Install FExplorer.

2. Launch it and goto the path/folder of your message inbox. If its on the C drive, it would be C:\system\Mail\00001001_S and the same if its on the E.

3. You will notice there are more folders, 0 to9 and a to f. Just go look into all those folders and you should be able to find the file that you wanna delete.

4. Once found, ** on Options>File>Delete.

5. Exit FExplorer & goto your Inbox to delete the file again.


Full phone formatting on a 6600!

If you encounter situation like below on your 6600,
1. Blank screen phone unable to reboot.
2. Phone only able to boot-up to "Nokia" word screen.
3. Warning of Application Error pops-up requently.
4. Or just because for the fun of it!

Do a Full phone formatting on your 6600! as steps below,

1. Make sure you have at least 3/4 charge of battery power left.

2. Backup your contacts list and personal files to MMC memory card.

3. Switch-off your 6600 phone.

4. Press and hold 3 keys;

Green dial key, * (star key) & no. 3 key and then press the power on/off to swtich on the 6600 phone.

Remember, do not let go all of the keys and hold keys until you see a formatting word screen show!

5. After a few minutes when the Full phone formatting completed, your 6600 will back to original system and factory settting.

All apps installed & id not of the phones' default will be lost. If you did a backup on your mmc, you can restore it back to the C drive again.


FExplorer Tips & Tricks.

* How to reset the operator logo :
1) go to the following dir :
c:\system\apps\phone\oplogo
2) delete any file in this directory
3) restart the phone

* to make a screenshot on a Nokia 3650, 6600 :
1) use the pencil key + '0'

* to make a screenshot on a SX1 :
1) use the shift key + '0'

* remember, there are some shortcuts :
: copy
: cut
: paste
: go to root
: PageUp
: top of the list
: PageDown
: file properties

* 'send command' fails new firmware
with some new firmware, some users have reported that the 'send command' (thru bluetooth, IR, ...) fails; it's due to a 'copyrigth protection' introduced in the new OS (!!!!), this happens only with some kind of files (eg: .SIS), in such case, simply rename the file (eg: wtih .SIS_ ) before trying to send them.


Digg Technorati del.icio.us Stumbleupon Reddit Blinklist Furl Spurl Yahoo Simpy

Tips and Tricks for Nokia Mobiles


About BT Connection: Setting Up & Pairing Your Phone.

This is a "How To" for Connecting the Nokia Series 60 device (Nokia 7650, 6600, 3650, 3660 etc...) via Bluetooth TM with the Windows Widcomm software used by TDK, Billington, MSI and others Bluetooth USB Vendors. The guide was created with the 7650 hadset but the steps are similar for other Series 60 devices and have been checked with the 3650 and 6600.

1.Pairing the computer and the Series 60 Handset
Pairing is the process of swapping pass keys and setting up a trusted connection between the Bluetooth USB adapter / card connected to the PC and the 7650 handset. Save any files and close any applications you may have been working on.

2. Set up Bluetooth TM on the 7650 by going to the Main Menu, selecting Connect and then Bluetooth.

3. Make sure the Bluetooth option is On and My Phone's Visibility is Shown to all. Remember what is in My Bluetooth Name - or edit it to one of your choice - this is what your 7650 will be seen as by other Bluetooth TM devices.

4. Right ** on the Bluetooth Icon in the system tray, on the menu that appears go to Setup and then ** on Security.

5. A window appears and all being well the right hand pane will have your 7650 (titled what ever you have entered into the phone's My Bluetooth Name entry). If nothing appears ** Refresh and your phone should then appear. Highlight the 7650 and ** Execute Pairing.

6. A window will pop up asking for a PassKey. Enter in a numeric only passkey and ** OK.

7. On the 7650 a screen pops up asking you to enter a passkey - key in the same number you just typed into the PC.

8. By default any connections from your PC to the 7650 must be manually accepted on the 7650. You have an option to set up a connection from the PC to your 7650 as authorized, this means when you connect from the PC to the phone it won't ask you if it's ok and will connect automatically.

9. To set it as automatic: On the 7650 in the Bluetooth TM Setting Screen, you joystick right to the Paired Devices screen, highlight the Computer you just paired with and press Options, select Set as Authorized and Yes. You will then see a padlock icon beside the paired device - this device will no longer require manual authorization for connections to the 7650.

Now you should set My phone's visibility to Hidden - so that unknown devices searching won't see your phone. You can still be connected to by any paired devices. Remember to switch it to Visible if you want to pair with a new device or receive a file / business card from someone with an unpaired device.


About BT Connection: Connecting To PC Suite

Manually make a serial connection to the Series 60 Handset to get the mRouter connection started:

1. To get a connection working you need one last step - you need to connect to the 7650's Bluetooh Serial port from the PC.

2.Right ** on the Bluetooth TM Icon in the system tray, on the menu that appears go to Services and then ** on Bluetooth TM Serial Port. Select Find Devices from the sub menu. (A shortcut to this connection will be created so next time you will have the 7650 listed in Bluetooh Serial Port submenu to save the next step).

3. Select the 7650 from list and ** Connect.

4. A window will appear telling you the connection is starting.

5. If you have not set the 7650 to automatically authorize a connection from this computer be ready to accept the connection request on the phone. If you have set it to automatically authorize then you won't be asked.

6. You should also see the Bluetooth icon on the 7650 start to flash showing a connection take place. Then you may get an error on the PC saying it can't connect and/or a message saying there is a Connection on COM0 (you can check the box to stop this appearing again), you can just ignore these message(s) for a minute. (** OK once the mRouter connection is made described below.)

A couple of seconds later the mRouter icon in the tray shows a connection in starting and then a connection being made. You can see also the active connection in the mRouter Connection Properties. The PC Suite application should then be ready for use.


Lil Tips / undocumented functions:

- At the top of the main-menu and every folder, the keys 1 to 9 are shortcuts to the icons 1-9

- A shortcut on the left menukey in standby-mode will take more time to open than a shortcut on the right menukey. Reason: The left key is also used for the keylock so it shortly waits for pressing the * button.

- While writing text press and hold "#" to switch between Alpha mode and Number mode. You can also press a key long to insert its number.

- In standby-mode, press and hold 0 to launch your wap home page.

- If you forgot your Wallet password, type *#7370925538# to reset it.

- If you have your keylock activated just press the on/off button to turn on your backlight to look at the time when it's dark without having to unlock the keypad.

- To keep the backlight on, run Torch (freeware), press and hold the Menu button and go somewhere else on the phone.

- To check your current firmware version simply type *#0000# in standby screen.

- To check your IMEI (International Mobile Equipment Identity) type *#06# in standby screen.

- To check your Bluetooth device address type *#2820# in standby screen.

- Start up in Safe Mode (no 'auto start' apps will be running): Hold down the pencil key when you turn on the phone and hold it on until you have to enter your PIN code.

- Format the phone memory by typing *#7370# in standby screen.

- In standby mode,
45# + dials the number on your sim in memory slot 45.
50# + dials slot 50 and so on.


Regarding Log Times.

When I set the GMT offset time in clock of 6600 to +530 then all my call log shows half hour prior to the actual time logged, and if it is -530 then log shows after half hour of actual time and if the same is set at +500 or -500 then the call log shows correct time of the call logged. But further I am not able to set the offset to + or - 500 as Psiloc world clock pro changes the timing to exactly +530 indian timing. Does anyone has a solution?

The log timings depends on the time set in your mobile clock. If you change the timing and make a call the log shows the changed time only. My previous post meant if th clock offset minutes is "00" and any hour, then log timings is accurate to the time set on clock. But opening World clock pro changes it automatically to +530 as the home location is india. and as the minutes offset changes to "30" the log time varies. If I dont use World clock pro nothing changes.


Phone Hangs on Start-up?

We sometimes hear from users of Series 60 handset users stating that they've filled up their memory, and the memory is so full that they can't get in to delete any files.

We've not had any experience of this, but the best thing to try is to restart the phone (by taking the battery out) when it "hangs" and then starting the phone in "safe mode". This causes the phone to load as few apps as possible at startup. To do this, hold down the ABC key, and while holding it down, start up the phone. Hopefully you will then be able to transfer files from your C drive to your MMC to free up the memory.

As a very last resort, you can format the phone and start again - 1st post in this FAQ section - This will remove all data, and you'll have to restore your phone's information from a backup which you may have made on your MMC or via PC Suite.

If you still can't get into the phone, the final option appears to to be to take the phone to the nearest Club Nokia shop (or your retailer), who should be able to re-flash the phone to factory settings.


Digg Technorati del.icio.us Stumbleupon Reddit Blinklist Furl Spurl Yahoo Simpy

Tips and Tricks for Nokia Mobiles

About Operator Logos

The operator logo is the picture on top of your phone screen, in most cases is the name of your operator.

How to change it for a nice picture? You can do this by diferent ways:

First create this folder if you dont have it:

C:\System\Apps\Phone\Oplogo\

The operator logo will be stored on it...)

You can use FExplorer (any jpeg/bmp, no resize), seleQ (any image, it will resize it) --> select the image you want be operator logo, select options-file-set as operator logo.

You can make your own logo:

The operator logos have the following format:

COUNTRYCODE_NETWORKCODE_SUBNETCODE.BMP

For example, for Spain:

Amena: 214 03 -> 214_3_0.BMP
Movistar: 214 07 -> 214_7_0.BMP
Vodafone: 214 01 -> 214_1_0.BMP

In the PHILIPPINES:
Smart: 515 01
Globe: 515 02

The size for bmp is 97 x 25 pixels.

Also, you can store diferent logos for diferent operators. For example if you change your SIM to other operator, you will see the other logo, or if you travel to other countries, you can store diferent logos for the operators in this countries.

You have a list of country codes and network codes here , just ignore the first "0" in network code if any.

If you want to delete the logo to restore the original (name of the operator) just delete the bmp file from c:\system\apps\phone\oplogo.


Backing Up Phone Settings on 6600/7610.

If you ever come to a point when you need to hard format your phone or maybe upgrade to a new firmware, I'm sure definately would like to save the current settings of your phone. So this is what you should do;

How to backup phone settings to MMC.

Menu>Extras>Memory>Options>Backup phone mem.

Once the formatting or upgrading is done, you can then restore back the settings by doing;

Restoring settings after phone format.

Menu>Extras>Memory>Options>Restore from card.


Cant Uninstall An Application?

When you cant uninstall an application(most of the time Java games) using the Manager function of the phone, then do this;

1. Install FExplorer.

2. Launch it and goto the path/folder of the Application. I'm assuming you have install it to the MMC so the path would be something like,

E:\system\apps

and you will see lots of folders in there that is only labelled by numbers(for Java games/apps) or the name of the application. Go though them one by one. Open the text file in that folder to exactly know the name of the application in that particular folder if you dont see any icons or familiar name.

3. Then if its the correct folder, "move-out" of the folder, ** on Options>File>Delete.

4. Then goto the Manager to uninstall it if its still listed.

5. Reboot.


About Infra Red Connections.

This procedure assumes that the infrared device is connected to a serial port on your computer. Use this procedure only if Windows did not automatically install an infrared device when you turned on your computer. Typically, Universal Serial Bus (USB), PCMCIA, and other Plug and Play-compliant infrared devices are automatically detected and installed.

To add a new infrared device:
01. ** Start, point to Control Panel, and then ** Add Hardware.
02. The Add Hardware Wizard starts.
03. ** Next.
04. ** Yes, I have already connected the hardware, and then ** Next.
05. In the Installed hardware list, ** Add a new hardware device, and then ** Next.
06. ** Install the hardware that I manually select from a list (Advanced), and then ** Next.
07. In the Common hardware types box, ** Infrared devices, and then ** Next.

Do one of the following:

01. If you do not have an installation disk for the infrared device, ** the manufacturer of the device in the Manufacturer list, ** the infrared device that best matches your hardware in the Infrared Device list, and then ** Next.

02. If you have a manufacturer's installation disk for a compatible driver, ** Have Disk. Insert the manufacturer's installation disk into the appropriate drive, and then ** Next.
Follow the instructions that are displayed on the remaining pages of the Add Hardware Wizard to install the infrared device.


View the Properties of an Infrared Device
To use this procedure, there must be an infrared device installed on your computer. Note that the settings for the infrared device are configured automatically when you install the device, and typically do not have to be changed. To view the properties of an infrared device:

01. ** Start, ** Control Panel, and then ** Wireless Link.

02. ** the Hardware tab, ** the infrared device for which you want to view properties, and then ** Properties.


Configure a Serial Port for Infrared Communication
Your computer must support an infrared mode for a serial port. Use this procedure to install an IrDA transceiver that is provided by the computer manufacturer. To configure a serial port for infrared communication:

01. Start the BIOS configuration utility for your computer. Note that the method for starting the BIOS configuration utility varies from one computer to another. For many computers, you can start the BIOS configuration utility by pressing a function key that is indicated during the computer startup process. Some computers require that you start by using special configuration disks. For more information about how to enter BIOS Setup, see your computer manufacturer's documentation.

02. In the peripheral or serial port configuration section, change the mode to IrDA or Infrared.


Troubleshooting
Installing an IrDA transceiver disables the serial port. Do not attach a serial IrDA transceiver to a serial port.


Digg Technorati del.icio.us Stumbleupon Reddit Blinklist Furl Spurl Yahoo Simpy

Tips and Tricks for Nokia Mobiles


FOR ALMOST ALL NOKIA MOBILES(CODES)

3370# Activate Enhanced Full Rate Codec (EFR) - Your phone uses the best sound quality but talk time is reduced my approx. 5%

#3370# Deactivate Enhanced Full Rate Codec (EFR)

*4720# Activate Half Rate Codec - Your phone uses a lower quality sound but you should gain approx 30% more Talk Time.
#4720# Deactivate Half Rate Codec.

*#0000# Displays your phones software version, 1st Line : Software Version, 2nd Line : Software Release Date, 3rd Line : Compression Type.

*#9999# Phones software version if *#0000# does not work.

*#06# For checking the International Mobile Equipment Identity (IMEI Number).

#pw+1234567890+1# Provider Lock Status. (use the "*" button to obtain the "p,w" and "+" symbols).

#pw+1234567890+2# Network Lock Status. (use the "*" button to obtain the "p,w" and "+" symbols).

#pw+1234567890+3# Country Lock Status. (use the "*" button to obtain the "p,w" and "+" symbols).

#pw+1234567890+4# SIM Card Lock Status. (use the "*" button to obtain the "p,w" and "+" symbols).

*#147# (vodafone) this lets you know who called you last.

*#1471# Last call (Only vodofone).

*#21# Allows you to check the number that "All Calls" are diverted to.

*#2640# Displays security code in use.

*#30# Lets you see the private number.

*#43# Allows you to check the "Call Waiting" status of your phone.

*#61# Allows you to check the number that "On No Reply" calls are diverted to.

*#62# Allows you to check the number that "Divert If Unreachable (no service)" calls are diverted to.

*#67# Allows you to check the number that "On Busy Calls" are diverted to.

*#67705646# Removes operator logo on 3310 & 3330.

*#73# Reset phone timers and game scores.

*#746025625# Displays the SIM Clock status, if your phone supports this power saving feature "SIM Clock Stop Allowed", it means you will get the best standby time possible.

*#7760# Manufactures code.

*#7780# Restore factory settings.

*#8110# Software version for the nokia 8110.

*#92702689# Displays - 1.Serial Number, 2.Date Made, 3.Purchase Date, 4.Date of last repair (0000 for no repairs), 5.Transfer User Data. To exit this mode you need to switch your phone off then on again.

*#94870345123456789# Deactivate the PWM-Mem.

**21*number# Turn on "All Calls" diverting to the phone number entered.

**61*number# Turn on "No Reply" diverting to the phone number entered.

**67*number# Turn on "On Busy" diverting to the phone number entered.

12345 This is the default security code.

press and hold # Lets you switch between lines.


Digg Technorati del.icio.us Stumbleupon Reddit Blinklist Furl Spurl Yahoo Simpy

Tips and Tricks for Nokia Mobiles

Tips and Tricks for Nokia Mobiles
Downloading & Installing Java Files

Java files can be a bit tricky at times. Most of the time, after you have downloaded and saved the java file on your pc, windows tend to change the icon (& sometimes the extension) of the file into a .zip one.

And this will led to those not familiar with this issue to extract the file. Once that is done, you will see a lot of folders and files. This is not the right way but ofcourse theres a way to get around this. Heres what you should do instead;

First, on your PCs, launch Windows Explorer and then select

Tools>Folder Options>View and "un-tick" the Hide extensions for known file type.

Now only can you see the full extension of a file and change the .zip into .jar (if necessary) and send it to your phone.


Digg Technorati del.icio.us Stumbleupon Reddit Blinklist Furl Spurl Yahoo Simpy

Tips and Tricks for Nokia Mobiles

Increase Your MMC Space.

QUOTE
Your files in MMC are stored in multiple (disk) blocks.
So if you format using 16K block, the space used will be 16K eventhough your file is just 1K.

If you buy MMC, it is usually preformatted with 16K block. Therefore alot of space is wasted as most installed program files are usually less than 2K.

You will need a card reader to do this:-

1. Connect card reader and copy all your files in the MMC to computer disk. (Make sure you set the show all/hidden/os files to "on")

2. Do a format of the MMC using command line "format" and use the /A=size option.

Alternative, you can use the Disk Management in Adminstrative Tools to format. Make sure you select FAT. For 256MB MMC, smallest block you can use is 4K, 128MB is 2K, 64Mb is 1K and 32MB is 512B.

(Note: You cannot use the phone "format MMC" to do this as the format just clear the allocation table and does not change the block size)

3. Copy back all files to MMC.

Now you will find that you will have more space.
256mb MMC got back 30+ mbs


Knowing File Extensions

In downloads thread you can find diferent type of files (like you can find it over the web...)

.sis = Symbian installation file, just send it to your phone, and install.

.jar = Java installation, send file to your phone, and install.
Note about .jar files. You dont need to extract the .jar files into your PC, juest send them to your phone directly. By the way, if you get a.zip (or other extension) and when extract its content you get lot of files and folders, files like \META-INF\MANIFEST.MF, or *.class, it should be a .jar file... then, dont extract, just rename the main .zip to .jar. and send to your phone.

.zip = The standard compressed file, you can use winzip to extract the content...

.ace = Other format of compressed file:

..rar = And the compressed format about everybody ask...


Sending Files via BT & IR.

Where are the files that you send to your phone via IR or BT?

There are in mail folder:

If you store your messages in phone memory, there are in c:\system\mail\...

If you store your messages in MMC, there are in e:\system\mail\...
Files in inbox are in folders like "*_F "

For example: E:\system\mail\00001001_S\0\00100c60_F\ (file)
or E:\system\mail\00001001_S\1\00100bc1_F\ (file)
or E:\system\mail\00001001_S\2\00100bc2_F\ (file)


Digg Technorati del.icio.us Stumbleupon Reddit Blinklist Furl Spurl Yahoo Simpy

Tips and Tricks for Motorola

All Motorola Secret Code

Motorola L6:
------------
bla hold * 65512890 for reset
bla hold * 5806 sw version
blahold * 487989 NS lock menu
bla hold * 482896 CP
bla hold * 574243 NS
blahold * 967678 SP
bla hold * 362628 IMSI
bla hold * 787090 Lock net level
bla hold * 787292 Lock net level

Reset L7 security code without any cable
---------------------------------------
press menu button enter 6 time 0 and then press ok

bla*#06# IMEI
in permament test mode
bla (* hold 2 sec)
bla ***113*1*[OK] net monitor
bla T205/T19x (ACER)
bla *#300# OK List the Software and Hardware version
bla *#301# OK Full Keypads functional Test
bla *#303# OK Set Default Language to English
bla *#304# OK Set OFF engineering mode
bla #304*19980722# OK Set ON engineering mode
bla *#305# OK Location: 1 OK
bla *#307# OK Engineering Test Mode
bla *#311# OK Phone code changed to default code
bla *#400# OK ADC, Cal val*
bla *#402# OK Adjust Display Intensity / Contrast
bla *#403# OK List the Manufacturing Informations
bla 19980722 OK Master Unlock code for Phone and Sim Lock
bla *#302# OK Acoustic test*
bla 7.1 Greeting
bla 7.2 Main VlmGain
bla 7.3 Input Cal
bla 7.4 Output Cal
bla 7.5 Side In Gain
bla 7.6 Vox Gain
bla 7.7 Min Mic Engy
bla 7.8 More
bla (a) In Vlm Gain
bla (b) Aux Vlm Gain
bla (c) Silence Prd
bla (d) Supp Prd
bla (e) In Volume
bla (f) Out Volume
bla (g) Icon
bla (h) Image
bla (i) Animation
bla *3370# EFR ON (enhanced full rate)
bla #3370# ERF OFF
bla *#72837726# OK Confirm ?, Data saver
bla 1234 OK Phone code default
bla *#0000# OK Setting saved, restore set phone do default language
bla *#0048# OK Fast change polish langpack
bla *#0007# OK Fast change russian langpack

MOTOROLA 3xx
bla *#06# and quick 'menu-key' and 048263* (Push the key quickly!)
and entering at field "OPTCODE" you must try several times.
If not working try with MOTO TEST CARD inserted.
Security code - 32*118*1*0*0
Model - 32*279*1*0*8
Flex ver - 32*383*1*0*0
Master Reset - 18*0
Master Clear - 18*1
Set band GSM 900 - 10*0*3
Set band DCS 1800 - 10*0*4
Set band PCS 1900 - 10*0*5
Set dual band GSM 900/1800 - 10*0*6
Read band - 10*1*0 => 3-GSM, 4-DCS, 5-PCS, 6-GSM/DCS
User code - 32*116*1*0*0 /coded:00310032003300340000 - 1234/
Read imei - 32*4*1*0*0 "OK" /coded:083a05092700247709-350907200427799/
bla 47*4*1*0*9*081A32547698103254 => IMEI=123456789012345
it is possible to change IMEI.........


Digg Technorati del.icio.us Stumbleupon Reddit Blinklist Furl Spurl Yahoo Simpy

K-Lite Codec Pack 4.0.0


K-Lite Codec Pack is a collection of codecs and DirectShow filters. Those components are needed for encoding and decoding various audio and video formats. This Codec Pack is designed as a user-friendly solution for playing all your movie files.

Full supports both playback and encoding. This package is for power users and people who do their own encodings.

Features: It it always very up-to-date with the newest (and/or best) versions of the components. It is very user-friendly. The installation is fully customizable, meaning that you are able install exactly those components that you really want. Uninstallation removes all files and registry entries created by the pack. It is extremely easy to make a fully customized unattended installation. It has been very well tested, so that the package doesn't contain any conflicting or buggy codecs. It tries to avoid potential problems with existing codecs and even fixes some problems. The pack is able to detect broken codecs and filters on your system, and remove them for you. It is a very complete package, containing everything you need to play your movies. There are different packages. From small to extra-large. Suitable for both novice and expert users.


Digg Technorati del.icio.us Stumbleupon Reddit Blinklist Furl Spurl Yahoo Simpy

Portable Yahoo Messenger 9.0


All you need is a headset, or a microphone and speakers. It's that easy - just click the Call button.

Have all your IM friends in one place. Ping-away with people who use Windows Live Messenger. They'll also be on your contact list so you can see when they're online.
Add your personal touch. Handy plug-ins deliver the stuff you want to your Messenger. Choose Yahoo! plug-ins or ones from eBay, Amazon.com, and more. See more plug-ins.

DOWNLOAD


Digg Technorati del.icio.us Stumbleupon Reddit Blinklist Furl Spurl Yahoo Simpy

Multiple login in yahoo messenger Without Using any Software

Using this trick you will be able to login with many yahoo id's at same time.

1. Go to Start ----> Run . Type regedit, then enter.
2. Navigate to HKEY_CURRENT_ USER --------> Software --->yahoo ----->pager---->Test
3. On the right page , right-click and choose new Dword value .
4. Rename it as Plural.
5. Double click and assign a decimal value of 1.

Its done!!

Now open yahoo messenger and login with any yahoo id. Then again click on yahoo messenger icon. You will see that another yahoo messenger opens in which you can login.

Before this tweak, you will open yahoo messenger and login with any yahoo id and again when you click on yahoo messenger icon to login with other yahoo id then other new messenger will not be opened, the same will again pop-up which you've opened before.


Digg Technorati del.icio.us Stumbleupon Reddit Blinklist Furl Spurl Yahoo Simpy

Yahoo! Messenger 9.0 Beta


Connect with all your friends:
Instant message with friends on Yahoo!, Windows Live™ Messenger and more
Show off your status:
Easily add links and emoticons to your status messages
Watch videos together:
Share videos from popular sites and watch them with friends right in your IM window

DOWNLOAD
http://rapidshare.com/files/125347618/msgr9us.exe


Digg Technorati del.icio.us Stumbleupon Reddit Blinklist Furl Spurl Yahoo Simpy

Tips & Tricks relating to OS 9.1/9.2 Applications

Change The Default Name Of Icons In S60v3

This trick is very cool...
See the image below...
The attached file has a complete way how to do it...


Attached File:
How to Change


Smooth LCG Smartmovie Settings

Here is the way:
Download ffdshow from www.google.com searches-its free
install smartmovie converter
In smartmovie,change the encoder from xvid to ffdshow and configure it in this way:

Generic:
MPEG4
FOURCC.DivX
Max keyframe interval 254
min keyframe 1
one pass quality based-%70 i recommend

Audio:
32 kbps 16000hz


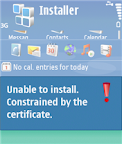
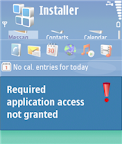
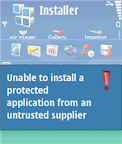
Interpreting Signing Error Messages in S60 3rd Edition

Message: Certificate error. Contact the application supplier.

Hint: You may have tried installing unsigned application. Note that signing is mandatory S60 3rd Edition. You can use self-signed certificate or developer certificate from Symbian Signed to sign your application.


Message: Unable to install. Constrained by the certificate.


Hint: This message pops up when you attempt to install developer certificate in the unsupported device. The developer certificate from Symbian Signed can only be used in a limited number of devices. Remember that you have to send your IMEIs to Symbian Signed when requesting certificate. You cannot use the certificate in other devices that is not in your IMEIs list.

Message: Required application access not granted.


Hint: Check that your certificate can be used to sign all capabilities needed by your application. For example, if you use self-signed certificate, you can only sign basic set capabilities, i.e. NetworkServices, ReadUserData, WriteUserData, LocalServices and UserEnvironment. If your application requires one of the extended capabilities, for example SwEvent, you cannot sign it with self-signed certificate. In this case, apply for developer certificates from Symbian Signed.


Message: Unable to install a protected application from an untrusted supplier.


Hint: If you use self-signed certificate, make sure that your application uses unprotected UID, i.e. 0xA0000000 - 0xAFFFFFFF. If you use protected UID (0x20000000 - 0x2FFFFFFF) or legacy UID (0x10000000 - 0x1FFFFFFF), you will get this message.


Message: Unable to install.


Hint: This message may come up when your installation file (.sis/.sisx) copies files to other application's private folder, i.e. \private\uid. Note that Symbian 9 introduces data caging concept, it means you don't have access to other application's private folder.

In case of expired certificate...
Do this...
Set the phone date back by 7-8months...
Than install the app...
After doing that reset the date back to routine...

if still the problem is present...
In that case your certificate has expired...
Get a new certificate from symbian signed...
As the certificate got from symbiansigned are valid only for 6months...


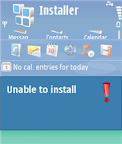
Deleting "Stuck" Installer Files in S60 3rd Edition

I have seen a problem with “stuck” installer files in S60 3rd Edition phones for a couple of times. The information from Application Manager shows that the applications are not installed. However, they cannot be deleted because there is no Delete menu (see screenshot below). They cannot be re-installed either because it always fails with “Unable to install” message. Those files are basically just stuck there.

From my opinion, it looks like a bug in S60 3rd Edition (not sure if this has been fixed in S60 3rd FP1). I don’t really know how to reproduce this problem, but it has happened to my phones several times. Once, I saw this problem after one application failed to install. In other occasions, I saw this problem after resetting my phone to the default factory settings.

What should we do if we have this kind of “stuck” installer files in S60 3rd Edition? One way is to delete the installer file manually via Windows Explorer. Unfortunately, we cannot use any file manager application because those files are located in a protected folder.


* Firstly, connect your phone to a PC via USB.

* Choose Data Transfer (a.k.a. Mass Storage). Do not select PC Suite because you won’t be able to browse protected folders in PC Suite mode.

* Open Windows Explorer on your PC.

* Go to \private\10202dce on the phone’s folder.

* There, you should be able to find the installer files (.sis). Just remove them using Windows Explorer.

You can also acess & even delete these file using phone just go to file manager

And use Search (find) the folder private

and in that go to the 10202DCE and delete the file which are not installing


Another Tip for Password-protected Memory Card Only for E-series

How to solve the problem? If, for some reasons, you activate remote lock option on your phone, it will change your memory card’s password too. Just for your information, remote lock option allows you to lock your phone by sending SMS to it. It is a nice feature if you accidentally left your phone somewhere and you don’t want other people using it. You can activate this feature from Tools | Settings | Security | Phone and SIM | Allow remote lock menu. The password of your memory card will be your remote lock message.


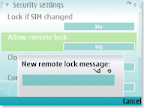
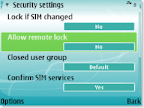
So, if you still remember your remote lock message, then try to unlock your memory card’s password using that message.
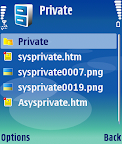


Acces to Private and SYS folder on your MMC without PC

Little trick

1)Via cardreader or data transfer remove readonly attribute from sys and private folders

2) Open pre installed fileman

3) Functions - Search(find)

4) Enter private or sys

5) Wait

6) Enjoy

P.S sys is readonly

Some folders

10207114 - Themes

102033E6 - Java Applications

1000484b - Mail folder

10202dce - Installed sis file


Steps:

• Press menu key, find "File Mgr." (the default file manager) and open it

• Press Options / Find


You will be prompted to choose between phone memory and memory card. Press down to select memory card

Type the name of that protected folder you want to browse through: either Sys or Private


Press Find and wait

• The folder will appear in search results. It should appear the first result if you type its whole name


What will you be able to do?

• Browse through folders, subfolders and files inside sys folder

Copy files/folders from sys to another normal folder

Browse through folders, subfolders and files inside private folder

Move and copy files/folders from private folder to another normal folder

Rename and delete files/folders inside private folder


Solution for backing up & restoring Messages Symbian S60 3rd Edition

A breakthrough for Symbian S60 3rd Edition (OS 9.1)

Solution for backing up and restoring Messages

I am very glad to inform you all, the MOST-WANTED solution for backing and restoring your messages from your memory card. By default in symbian S60 edition phones, when we store messages on memory card, it gets stored in system/mail folder.

The same thing happens on Symbian 3rd edition phones too, but only difference is that the mail folder is buried deep inside the private folder..

What you need to access it..

1) Connect your handset to pc in the “Data transfer” (Mass storage) mode

2) Go to the Private folder on your memory card

3) Open the folders in sequential manner

) Look for 1000484b (PARENT) folder or like that under which you will find Mail (Child) or mail2 folder, you are looking for.

5) Copy that (PARENT) folder to your PC

6) After you format you memory card using handset, copy back the same folder PARENT from pc again under Private folder on memory card using mass storage mode.

7) Voilla!!! You have got all your messages as it is.


-- OR --


Follow 1st step as it is, then go to search option on your pc, include system, hidden files and folders in search options and search for “mail” folder.. and follow steps 5 to 7 as it is.

Post any of your queries..

Another tutorial in line for creating folders under folder in damn easy way

Note:Message cant be transfered to phone memory...

The system files of phone memory cant be accessed due to new security levels in the 3rd edition phones...


Save battery on s60v3 wifi phone

A llittle trick to save battery power

Menu -> Tools -> Setting -> Connection -> Wireless LAN -> Options -> Advanced Settings

choose "yes" )

Automatic config -> disabled -> TX power level -> Options -> Change -> (change 100 mW to 4 mW) -> OK

this will economise batery but wifi will be more difficult to use


Nokia 5500 Sport Tip for saving battery

I 5500, you keep seeing sport icon ruuning in background even when its not being used, consuming the RAM as well as battery at that time.


You can kill can kill this by using FExplorer's Processes view and save these consumptions.

lternatively, as i had read somewhere on web so i'll just list that here-connect USB to your phone and then to PC & choose data transfer-that closes all the applicationsthough. And you might try opening only useful aplications once you disconnect the USB.


Small Font Solution For Nokia E65

Fonts too small? - Get new fonts!

Those who are still having problem changing fonts on your E65 phone, here is the solution....


Tested and works nicely on E65 (using Verdana font) with this firmware:

1.0633.18.01

11.01.07

RM-208


Note: To get your phone firmware, press *#0000# on Idle screen


What you need:

-PC

-PC card reader

-Y-Browser or F-Explorer programs in your phone


Steps:

1. Using Y-Browser or F-Explorer, go to directory “z:” (of your phone memory). If you do not have these program, go search the forum

2. Under the “z:” folder, go to folder named “resource”

3. go to folder named ”fonts”

4. you will see list of fonts file used by your phone. Note down name of each file. Most likely you will see;

S60SC.ccc

S60TCHK.ccc

S60ZDIGI.ttf

SWABIU.ttf

SWABRU.ttf

SWARIU.ttf

SWARRU.ttf

5. Take out your phone memory card and put it into your PC card reader

6. In your PC, go to folder C:/Windows/Fonts or download fonts from websites

7. Copy the “verdana.ttf” font file (or any other font file you prefer)

8. Duplicate font file you copied above (in this case you have to duplicate 7 times) and rename them exactly as mentioned under step 4

9. Access your memory card and find folder named “resource”. If there is no such folder, create one.

10. Under the “resource” folder, create a folder named “fonts”

11. Copy all files you created under step 8, and paste under the “fonts” folder you just created under step 10

12. Put back your memory card into the phone and turn on the phone

Your phone should now have new fonts


If you want to revert back to original font, just delete all files you created under step 11 and remove the “fonts” folder (in your memory card “resource” folder)


Remove beep sound while recording calls on OS 9.1/9.2

I Installed Ultimate Recorder v3.01 on my Nokia E61i but there was beep while call recording. Then removed this and installed Killer-Mobile Total Recall and threre was no beep. but Total
recall has limitation, not to record memo/voice notes with assigning keys.
So i kept both, now there is no beep while call recording and i can take voice notes by pressing assigned keys i.e default #0.But you have to keep running both recorders.
This is for those who are unable to install Ultimate Recorder v4.01 or getting difficult to sign files at symbiansigned, required for Ultimate Recorder v4.01 and want to stay with v3.01 and don't want beep while call recording.


Register Opera 8.65 on S60v3

Use a File explorer Y-Browser or X-plore
Go to c:\system\data and then set "viger.dat" file's attribute to "Read Only"

And it will become "Full Version"


N73 ME & 5700 XpressMusic
How to exit Music Player
Actually, there is a point. The N73 Music Edition preloads the Music Player app on startup so there is no delay when you push the Music key on the right. Although you can't see it right away on startup, if you open the Task Manager, you can see that the Music player is running.

Using latest firmware of N73; You can also try this trick on 5700

For those who cant exit music player, here are the steps.
1. Go to ‘All Songs’.
2. Select ‘Options’ > ‘Album Art’.
3. Select ‘Options’ > ‘Change’.
4. Select ‘Graphic Download’.
5. Select ‘Options’ > ‘Exit’.

As u can see, it’s very inconvenient to go through all this every time one wants to exit the Music Player. So any1 with any easier way, pls post it here.

Or download Epocware Handy Taskman and choose 'Kill App' or at first play some music then go to option-choose equaliser then choose exit...
It will sure exit from music player...


Digg Technorati del.icio.us Stumbleupon Reddit Blinklist Furl Spurl Yahoo Simpy