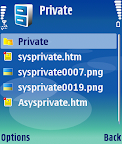
Change The Default Name Of Icons In S60v3
This trick is very cool...
See the image below...
The attached file has a complete way how to do it...
Attached File:
How to Change
Smooth LCG Smartmovie Settings
Here is the way:
Download ffdshow from www.google.com searches-its free
install smartmovie converter
In smartmovie,change the encoder from xvid to ffdshow and configure it in this way:
Generic:
MPEG4
FOURCC.DivX
Max keyframe interval 254
min keyframe 1
one pass quality based-%70 i recommend
Audio:
32 kbps 16000hz
Interpreting Signing Error Messages in S60 3rd Edition
Message: Certificate error. Contact the application supplier.
Hint: You may have tried installing unsigned application. Note that signing is mandatory S60 3rd Edition. You can use self-signed certificate or developer certificate from Symbian Signed to sign your application.
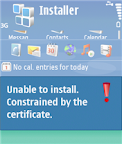
Message: Unable to install. Constrained by the certificate.
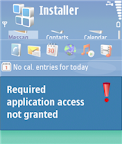
Hint: This message pops up when you attempt to install developer certificate in the unsupported device. The developer certificate from Symbian Signed can only be used in a limited number of devices. Remember that you have to send your IMEIs to Symbian Signed when requesting certificate. You cannot use the certificate in other devices that is not in your IMEIs list. Message: Required application access not granted. Hint: Check that your certificate can be used to sign all capabilities needed by your application. For example, if you use self-signed certificate, you can only sign basic set capabilities, i.e. NetworkServices, ReadUserData, WriteUserData, LocalServices and UserEnvironment. If your application requires one of the extended capabilities, for example SwEvent, you cannot sign it with self-signed certificate. In this case, apply for developer certificates from Symbian Signed. Message: Unable to install a protected application from an untrusted supplier.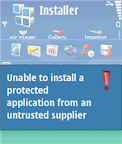
Hint: If you use self-signed certificate, make sure that your application uses unprotected UID, i.e. 0xA0000000 - 0xAFFFFFFF. If you use protected UID (0x20000000 - 0x2FFFFFFF) or legacy UID (0x10000000 - 0x1FFFFFFF), you will get this message.
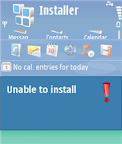
Message: Unable to install.
Hint: This message may come up when your installation file (.sis/.sisx) copies files to other application's private folder, i.e. \private\uid. Note that Symbian 9 introduces data caging concept, it means you don't have access to other application's private folder.
In case of expired certificate...
Do this...
Set the phone date back by 7-8months...
Than install the app...
After doing that reset the date back to routine...
if still the problem is present...
In that case your certificate has expired...
Get a new certificate from symbian signed...
As the certificate got from symbiansigned are valid only for 6months...
Deleting "Stuck" Installer Files in S60 3rd Edition
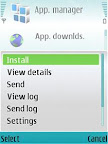
I have seen a problem with “stuck” installer files in S60 3rd Edition phones for a couple of times. The information from Application Manager shows that the applications are not installed. However, they cannot be deleted because there is no Delete menu (see screenshot below). They cannot be re-installed either because it always fails with “Unable to install” message. Those files are basically just stuck there.
From my opinion, it looks like a bug in S60 3rd Edition (not sure if this has been fixed in S60 3rd FP1). I don’t really know how to reproduce this problem, but it has happened to my phones several times. Once, I saw this problem after one application failed to install. In other occasions, I saw this problem after resetting my phone to the default factory settings.
What should we do if we have this kind of “stuck” installer files in S60 3rd Edition? One way is to delete the installer file manually via Windows Explorer. Unfortunately, we cannot use any file manager application because those files are located in a protected folder.
* Firstly, connect your phone to a PC via USB.
* Choose Data Transfer (a.k.a. Mass Storage). Do not select PC Suite because you won’t be able to browse protected folders in PC Suite mode.
* Open Windows Explorer on your PC.
* Go to \private\10202dce on the phone’s folder.
* There, you should be able to find the installer files (.sis). Just remove them using Windows Explorer.
You can also acess & even delete these file using phone just go to file manager
And use Search (find) the folder private
and in that go to the 10202DCE and delete the file which are not installing
Another Tip for Password-protected Memory Card Only for E-series
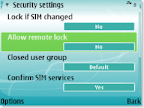
How to solve the problem? If, for some reasons, you activate remote lock option on your phone, it will change your memory card’s password too. Just for your information, remote lock option allows you to lock your phone by sending SMS to it. It is a nice feature if you accidentally left your phone somewhere and you don’t want other people using it. You can activate this feature from Tools | Settings | Security | Phone and SIM | Allow remote lock menu. The password of your memory card will be your remote lock message.
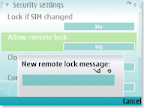
So, if you still remember your remote lock message, then try to unlock your memory card’s password using that message.
Acces to Private and SYS folder on your MMC without PC
1)Via cardreader or data transfer remove readonly attribute from sys and private folders
2) Open pre installed fileman
3) Functions - Search(find)
102033E6 - Java Applications
10202dce - Installed sis file
• Press menu key, find "File Mgr." (the default file manager) and open it
• Press Options / Find

You will be prompted to choose between phone memory and memory card. Press down to select memory card
Type the name of that protected folder you want to browse through: either Sys or Private

• The folder will appear in search results. It should appear the first result if you type its whole name
What will you be able to do?
• Browse through folders, subfolders and files inside sys folder
Copy files/folders from sys to another normal folder
Browse through folders, subfolders and files inside private folder
Move and copy files/folders from private folder to another normal folder
Rename and delete files/folders inside private folder
Solution for backing up & restoring Messages Symbian S60 3rd Edition A breakthrough for Symbian S60 3rd Edition (OS 9.1)
Solution for backing up and restoring Messages
I am very glad to inform you all, the MOST-WANTED solution for backing and restoring your messages from your memory card. By default in symbian S60 edition phones, when we store messages on memory card, it gets stored in system/mail folder.
The same thing happens on Symbian 3rd edition phones too, but only difference is that the mail folder is buried deep inside the private folder..
What you need to access it..
1) Connect your handset to pc in the “Data transfer” (Mass storage) mode
2) Go to the Private folder on your memory card
3) Open the folders in sequential manner
) Look for 1000484b (PARENT) folder or like that under which you will find Mail (Child) or mail2 folder, you are looking for.
5) Copy that (PARENT) folder to your PC
6) After you format you memory card using handset, copy back the same folder PARENT from pc again under Private folder on memory card using mass storage mode.
7) Voilla!!! You have got all your messages as it is.
Follow 1st step as it is, then go to search option on your pc, include system, hidden files and folders in search options and search for “mail” folder.. and follow steps 5 to 7 as it is.
Post any of your queries..
Another tutorial in line for creating folders under folder in damn easy way
Note:Message cant be transfered to phone memory...
The system files of phone memory cant be accessed due to new security levels in the 3rd edition phones...
Save battery on s60v3 wifi phone
A llittle trick to save battery power
Menu -> Tools -> Setting -> Connection -> Wireless LAN -> Options -> Advanced Settings
Automatic config -> disabled -> TX power level -> Options -> Change -> (change 100 mW to 4 mW) -> OK
this will economise batery but wifi will be more difficult to use
Nokia 5500 Sport Tip for saving battery
I 5500, you keep seeing sport icon ruuning in background even when its not being used, consuming the RAM as well as battery at that time.
You can kill can kill this by using FExplorer's Processes view and save these consumptions.
lternatively, as i had read somewhere on web so i'll just list that here-connect USB to your phone and then to PC & choose data transfer-that closes all the applicationsthough. And you might try opening only useful aplications once you disconnect the USB.
Small Font Solution For Nokia E65
Fonts too small? - Get new fonts!
Those who are still having problem changing fonts on your E65 phone, here is the solution....
Tested and works nicely on E65 (using Verdana font) with this firmware:
Note: To get your phone firmware, press *#0000# on Idle screen
-Y-Browser or F-Explorer programs in your phone
1. Using Y-Browser or F-Explorer, go to directory “z:” (of your phone memory). If you do not have these program, go search the forum
2. Under the “z:” folder, go to folder named “resource”
3. go to folder named ”fonts”
4. you will see list of fonts file used by your phone. Note down name of each file. Most likely you will see;
5. Take out your phone memory card and put it into your PC card reader
6. In your PC, go to folder C:/Windows/Fonts or download fonts from websites
7. Copy the “verdana.ttf” font file (or any other font file you prefer)
8. Duplicate font file you copied above (in this case you have to duplicate 7 times) and rename them exactly as mentioned under step 4
9. Access your memory card and find folder named “resource”. If there is no such folder, create one.
10. Under the “resource” folder, create a folder named “fonts”
11. Copy all files you created under step 8, and paste under the “fonts” folder you just created under step 10
12. Put back your memory card into the phone and turn on the phone
Your phone should now have new fonts
If you want to revert back to original font, just delete all files you created under step 11 and remove the “fonts” folder (in your memory card “resource” folder)
Remove beep sound while recording calls on OS 9.1/9.2
I Installed Ultimate Recorder v3.01 on my Nokia E61i but there was beep while call recording. Then removed this and installed Killer-Mobile Total Recall and threre was no beep. but Total
recall has limitation, not to record memo/voice notes with assigning keys.
So i kept both, now there is no beep while call recording and i can take voice notes by pressing assigned keys i.e default #0.But you have to keep running both recorders.
This is for those who are unable to install Ultimate Recorder v4.01 or getting difficult to sign files at symbiansigned, required for Ultimate Recorder v4.01 and want to stay with v3.01 and don't want beep while call recording.
Register Opera 8.65 on S60v3
Use a File explorer Y-Browser or X-plore
Go to c:\system\data and then set "viger.dat" file's attribute to "Read Only"
And it will become "Full Version"
N73 ME & 5700 XpressMusic
How to exit Music Player
Actually, there is a point. The N73 Music Edition preloads the Music Player app on startup so there is no delay when you push the Music key on the right. Although you can't see it right away on startup, if you open the Task Manager, you can see that the Music player is running.
Using latest firmware of N73; You can also try this trick on 5700
For those who cant exit music player, here are the steps.
1. Go to ‘All Songs’.
2. Select ‘Options’ > ‘Album Art’.
3. Select ‘Options’ > ‘Change’.
4. Select ‘Graphic Download’.
5. Select ‘Options’ > ‘Exit’.
As u can see, it’s very inconvenient to go through all this every time one wants to exit the Music Player. So any1 with any easier way, pls post it here.
Or download Epocware Handy Taskman and choose 'Kill App' or at first play some music then go to option-choose equaliser then choose exit...
It will sure exit from music player...